
Tissue Sampling, Embedding, Sectioning, Preservation and Transport Guidelines For MALDI-Based Spatial Metabolomics
MALDI-based spatial metabolomics relies on meticulous tissue preparation—how you sample, embed, section, store, and ship each specimen directly affects ionization efficiency, spatial resolution, and data quality. This short guideline summarizes practical requirements for tissue types and block sizes, choice of embedding media, ITO slides, cryosectioning conditions, and dry-ice transport. It is intended to support researchers using our MALDI-based spatial metabolomics services and to standardize sample handling across labs, ensuring reliable and comparable spatial metabolomics datasets.
Acceptable Tissue Sample Types for MALDI Spatial Metabolomics
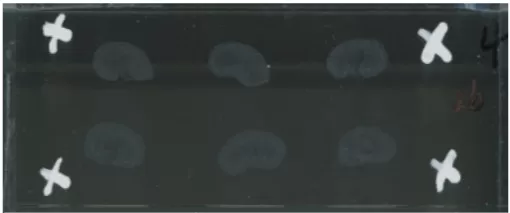
Tissue sections: Highly recommended. Three slides are required per sample.
Tissue blocks: Freshly embedded blocks are preferred. Frozen blocks without embedding are not recommended, as ice crystal formation during transport may compromise section quality. However, such samples can be accepted if clients acknowledge and accept the associated risks. One tissue block is required per sample.
Required Tissue Block Sizes for MALDI Spatial Metabolomics Experiments
Maximum crosssection: 65 mm × 40 mm, minimum 1.5 mm × 1.5 mm
Maximum height: 25 mm, minimum 2 mm
Recommended Embedding Media for Different Tissue Types
2–4% CMC: Suitable for heart, liver, spleen, lung, kidney, gastrointestinal tract, stomach, and reproductive organs.
FSC22: Recommended for brain, spinal cord, muscle, adipose tissue, and other water-rich tissues.
| Property | CMC(Carboxymethyl Cellulose) | FSC22 |
| Tissue Morphology Preservation | Excellent | Excellent |
| Mass Spectrometry Compatibility | Good – minimal interference | Excellent – specifically designed for MSI |
| Ion Suppression Effects | Slight ion suppression possible at high concentrations | Very low ion suppression |
| Sectioning Quality (Cryosectioning) | Stable; may be brittle at low temperature | More elastic, smoother sectioning |
| Metabolite Leakage Risk | Low | Very low |
| Background Signal in MS | Moderate | Very low |
| Ease of Preparation | Simple (1–2% aqueous solution) | Commercially ready-to-use |
| Best-suited for | Basic metabolomics imaging | Multi-omics (metabolomics + proteomics) |
| Histocompatibility | Good for standard H&E staining after washing. | Excellent; provides superior tissue morphology and sectioning quality |
| Compatibility with Other Modalities | May leach soluble components that could interfere with other analyses | Designed to be inert, minimizing risk of interference with transcriptomics… |
| Ease of Use & Reproducibility | Requires in-house preparation; potential for batch-to-batch variability. | Commercial, ready-to-use gel; ensures high reproducibility. |
| Cost | Low (commodity chemical). | High (specialized product). |
Recommended ITO Slides for MALDI-Based Spatial Metabolomics
Bruker ITO slides, 75 × 25 mm or 75 × 50 mm
Sectioning Requirements for MALDI Spatial Metabolomics
- Section thickness: typically 8–50 µm; for human and animal tissues, 12 µm is recommended.
- Placement guidelines: sections should be positioned at least 5 mm from the edge of the slide, with a minimum spacing of 5 mm between adjacent sections.
Procedures for Embedding, Storage, and Transport of Tissue Blocks
1. Prechilling:
Place the embedding medium and embedding molds on ice to precool. Clearly label the molds to indicate tissue cutting orientation.
2. Tissue Collection:
After euthanizing the animal, promptly dissect fresh tissues (e.g., tumor, brain, liver, spleen, kidney). Use forceps on clean paper to carefully remove any mucus, blood vessels, or hair attached to the tissue. Blot the tissue surface with clean paper to remove excess fluid.
3. Dry Ice Setup:
Prepare a foam box with an ample amount of crushed dry ice, level the surface, and place a metal plate on top.
4. Initial Embedding:
Add a thin layer of embedding medium into the mold. Place the mold on the metal plate over dry ice.
5. Embedding the Tissue:
Using prechilled forceps, quickly dip the tissue block in embedding medium inside a separate empty mold, then gently transfer it into the mold on dry ice. Continue adding embedding medium to fully cover the tissue.
6. Alignment & Bubble Removal:
Adjust the tissue position to ensure the target plane is parallel to the cutting surface. Avoid air bubbles; if bubbles form, gently remove them with a needle tip.
7. Freezing:
Immediately place the mold with embedded tissue into a 80°C freezer or cover with dry ice until the medium is completely solidified.
8. Packaging:
Wrap the embedded tissue block or the mold securely in aluminum foil, clearly marking the cutting plane. For smaller samples, place the foilwrapped block into a 50 mL centrifuge tube. If the block is too large for a centrifuge tube, use a larger sealed container such as a cryo box. Where possible, store multiple samples from the same group in separate molds within the same container for easier handling.
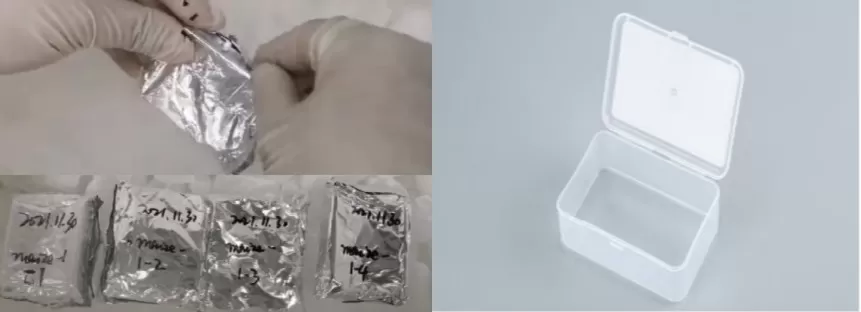
9. Shipping:
Completely bury the container in dry ice, ensuring both the top and bottom are well covered. Calculate dry ice at approximately 4 kg per day of transit, adjusted for actual shipping duration. Use sturdy foam boxes for shipment.
10. Important Notes
- Ensure no air bubbles form around the tissue during embedding, as bubbles can create cavities upon freezing that compromise sectioning quality.
- For best results, crush dry ice into small pieces before embedding to promote uniform cooling.
- Do not place samples directly into centrifuge tubes without aluminum foil wrapping. Unwrapped samples may stick to the tube walls, making removal difficult and potentially distorting sample morphology.
Procedures for Sectioning, Storage, and Transport of Tissue Sections
1. Tissue Preparation
Retrieve tissue samples from –80 °C storage and equilibrate at –20 °C (in a freezer or cryostat) for 30 minutes. Mount the sample onto the specimen holder by pipetting a small amount of CMC solution onto the round holder surface and placing the tissue onto the droplet. Allow the solution to freeze at –20 °C, securing the tissue in place. Note: The cutting surface should be oriented upward and kept as level as possible.
2. Sectioning
Secure the specimen holder on the cryostat head and adjust the angle and orientation. Set the appropriate section thickness. Adjust the anti-roll plate and trim the block.
- If sections crack, increase the specimen head temperature.
- If sections soften, reduce the specimen head temperature.
Between different tissue types, wipe the stage and anti-roll plate with pure ethanol to avoid cross-contamination.
3. Section Transfer
Using a pre-cooled brush, transfer freshly cut sections onto pre-cooled ITO slides. Place the back of the slide against the palm to gently melt the section until it becomes transparent. Immediately rub the back of the slide with a finger to evaporate residual moisture, turning the section from transparent to opaque white.
4. Storage
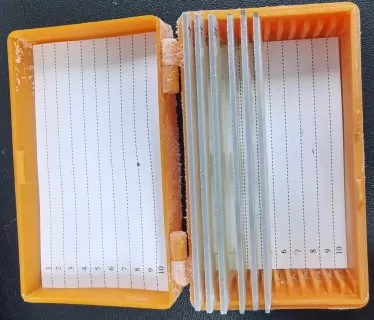
Place ITO slides containing tissue sections into a slide box and store at –80 °C.
5. Transport
For long-distance transport, pack the slide box in dry ice to maintain tissue integrity.
Next-Generation Omics Solutions:
Proteomics & Metabolomics
Ready to get started? Submit your inquiry or contact us at support-global@metwarebio.com.
